How to Prepare the Perfect Thanksgiving Bird
You just brought home a turkey and you’re ready to begin preparing your holiday feast, what’s next?
There are countless ways to prep and cook a turkey, but we’ve gathered the fundamental tips and tricks to help make holiday cooking a breeze.
How to Thaw a Turkey
If you’re working with a frozen bird, it’s important to know how long it will take to thaw before going into the oven. We recommend following one of these methods.
- Refrigerator: When it comes to food safety and quality, this method is fool-proof. The key is to plan ahead and allow 24 hours for every 5 lbs. Simple ensure that the refrigerator is 40˚F or below and place a drip pan under the thawing bird to avoid contaminating other food. The thawed turkey can remain in the refrigerator for 1 to 2 days prior to roasting and, if necessary, a turkey that has been thawed properly in the refrigerator may be refrozen.
- Cold Water: For a quicker method, thaw your bird in cold water. Be sure to keep the turkey in its original wrapping, change the cold water every 30 minutes and allow for 30 minutes of thawing per pound of weight. Roast the turkey immediately after thawing and do not refreeze or refrigerate.
*Reminder: Don’t forget to remove the giblets from the turkey cavities after thawing. Cook these separately.
How to Roast a Turkey
Roasting a turkey is not tricky! All it takes is some simple math. If you’re roasting your bird unstuffed, it will need to cook for approximately 15-20 minutes per pound. For a stuffed bird, simply add an additional 15-30 minutes.
Weight as Purchased vs. Cook Time
- 8 – 12 lbs: 2 3/4 to 3 hours
- 12 – 14 lbs: 3 to 3 3/4 hours
- 14 – 18 lbs: 3 3/4 – 4 1/4 hours
- 18 – 20 lbs: 4 1/4 – 4 1/2 hours
- 20 – 24 lbs: 4 1/2 to 5 hours
*Note: These times are for fresh or thawed turkeys. To cook a frozen turkey, plan to double the recommended times above.
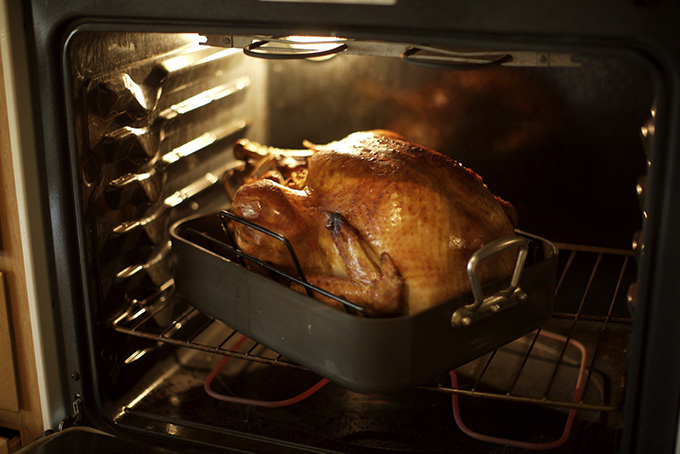
Method
- Preheat the oven to 325˚F. Remove the turkey wrapping, and wash the bird by running cold, wet paper towels along the body.
- Pull out the neck and giblets. Drain the juices and blot the cavity with paper towels.
- Brush the outside of the turkey with olive oil and rub with salt and pepper.
- Place the turkey breast-side-up on a flat rack in an open roasting pan, about two inches deep. Place the roasting pan lid or aluminum foil over the bird to avoid over browning.
- Roast according to the timetable above and remove the lid or foil during the last 45 minutes to allow the bird to brown.
- To verify that the turkey is done, use a food thermometer to check that the internal temperature and stuffing reaches 165˚F.
- Tent the turkey with foil and let rest for 25 minutes prior to carving to allow the juices to set.
Temperature
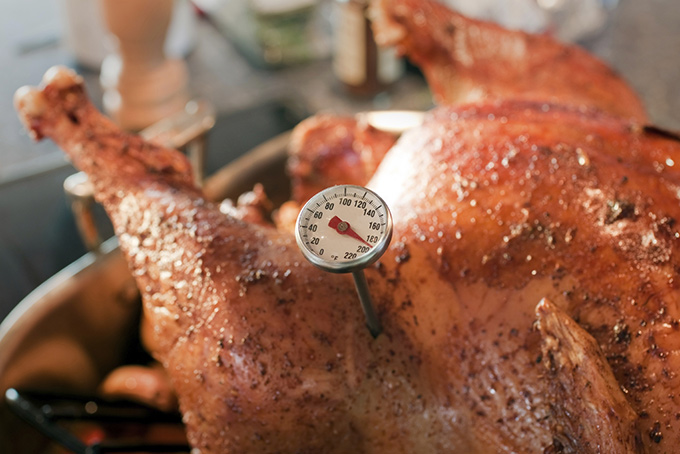
While many turkeys come with a plastic pop-up thermometer, pop-ups are often set too high and only read part of the turkey, resulting in an overcooked and dry turkey. Here’s are a couple of our favorite options for ensuring that your bird is cooked to perfection!
- Instant Read Thermometer: A digital, instant-read thermometer is a low-cost must-have for every kitchen. When inserted into the thickest part of the meat (without touching any bone), the temperature should register within a few seconds. Instant-read thermometers are not meant to be left in the meat during cooking. A quality instant-read meat thermometer will cost between $10.00 – $20.00.
- Continuous Read Digital Thermometer: If you wish to invest a bit more, continuous read digital thermometers are another great option. Designed to be left in the meat through the duration of cooking, they include a probe that is placed in the meat and a long cord connected to the thermometer unit, which can be placed on a countertop near the oven.
How to Carve a Turkey
In many families, one person is often the designated “turkey carver,” but if your holiday gathering doesn’t include an assigned carver, check out this helpful tutorial from Chef Billy Parisi.