Duck Breast with Cherry Port Reduction
This recipe and photos were provided by Sally Roeckell of Table and Dish and were originally published at 365Barrington.com.
My husband has always wanted to make a turducken for Thanksgiving. I’m pretty sure that’s a turkey and a chicken and a duck all smashed inside of each other. Each year I manage to avoid the topic until it’s too late and then I say “well maybe next year dear”.
The thought of cramming three different species of bird together and eating it seems barbaric but the people who have done it claim it’s quite delicious. This year if you want to refine your pallet and you’re not serving a big crowd, or even if you are and you want to add an extra special element to your Thanksgiving table, how about duck breast?
If you are a seasoned pro at making duck that’s wonderful but if you’ve never made duck and you have no clue (like me) how to begin, then this post is for you.
I did my research and the steps below are from an article written by Hank Shaw | December 15, 2014. This is the best How-To I have found for duck. I followed every step and I have to say the dish I prepared was delicious! I made Heinen’s Moulard Magret Duck Breast by D’ARTAGNAN. We were so pleased with the quality, freshness and cut of this duck. I can’t recommend it enough!
Here are the steps to follow for preparing your duck breast. Use the recipe at the end for measurements for the sauce. I served this one with a cherry port reduction sauce that my family now wants to put on everything. I hope you love it too!
Step One
Take the meat from the fridge. If you are using a domestic duck or a very fat wild duck, score the skin (but not the meat) in a cross-hatch pattern, making the cross-hatches about 1/2 inch across; this helps the fat render and will give you a crispier skin. Salt it well on both sides, then let it stand on a cutting board or some such for at least 15 minutes and up to an hour. It is far easier to control the internal temperature with a room-temperature breast than an ice-cold one.
Step Two
Pat the duck breasts dry with paper towels. If you are cooking a domestic duck or a very fat wild duck, put maybe 2 teaspoons of duck fat or cooking oil in a large pan; don’t use non-stick pans, as they don’t allow you to sear meat as well as steel. Lay the breasts skin side down and use them to smear the fat all over the surface of the pan. Turn the heat to medium-high. Yes, you read that right: Don’t preheat the pan. You want as much fat to render out as possible, so start with a cool pan.
If you are working with normal wild duck breasts, i.e., skinny ones, heat the pan over high heat for 1 minute, then add 2 tablespoons of duck fat, butter or some other oil. Let this get hot, but do not let the fat smoke. Only then do you lay the duck breasts in the pan, skin side down.
Either way, once the duck breasts start cooking, you will notice the “tails” of skin and fat from the head and the tail side of the fillet contract immediately. (What? You cut off those parts? Shame. Don’t do it again…) As the skin contracts, you will sometimes get a little oval patch on the tail end of the breast that curls up and doesn’t make contact with the pan. Use your tongs to press down on this part for 30 to 60 seconds. This gives you a more even sear.
Step Three
Let the pan do its job. Cook at a jocular sizzle — not an inferno, not a gurgle. Think about how bacon sounds in the pan when you cook it, and you have the right idea. How long? It depends. I like my duck medium-to-medium-rare. To do this with small ducks like teal or ruddy ducks, you need only about 3 minutes on the skin side, and you might want to keep the heat higher. Medium-sized ducks like wigeon, gadwall or wood ducks need 3 to 5 minutes. Mallards, pintail, canvasbacks and domestic ducks need between 5 and 8 minutes. If you are cooking a goose breast, you will want the heat on medium-low and you’ll need to cook the skin side a solid 10 to 12 minutes. The key is to let the breast do most of its cooking on this side — it’s the flattest, and will give you that fabulously crispy skin we all know and love. Again, I repeat: When you cook a duck breast, 3/4 of the total cooking time is on the skin side.
Step Four
Turn the breasts over. When? Follow the guidelines above, but also use your ears: You will hear the sizzle change; it will die down, just a bit. That’s when you turn. Now — this is important — lightly salt the now-exposed skin immediately. Doing this seems to absorb any extra oil and definitely gives you an even yummier, crispier skin. Let the ducks cook on the meat side for less time. I recommend:
- 1 to 2 minutes for small ducks
- 3 to 4 minutes for medium ducks
- 4 to 6 minutes for large wild ducks and domestic duck
- 5 to 7 minutes for geese
More than mere time, however, you need to just use The Force to know when your duck is ready. Not in tune with The Force? The next best thing is the finger test for doneness. Use this to determine when you’re almost ready. My advice is to go to the next step when your duck breasts are rare.
Step Five
Now “Kiss” the thick side of the breasts by standing two halves against each other. You will notice that duck and goose breasts plump up and contract as they cook. One side of the fillet will be wider than the other, and this side will need some heat.
You can see the wider side in the picture (above). Just tip the breasts on their sides and cook for 30 to 90 seconds, just to get some good color.
Step Six
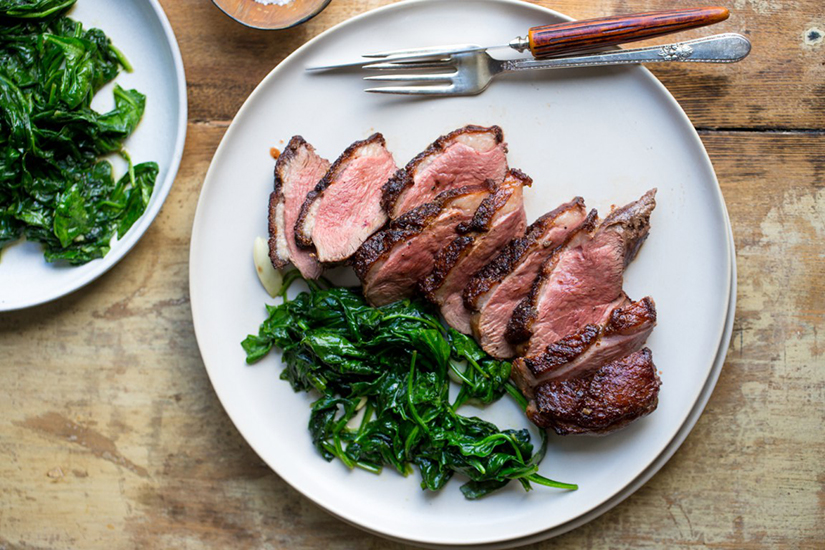
Take the duck off the heat and let it rest on a cutting board, skin side up. Teal need only need a minute or two rest, while big Canada geese might need 10 minutes. Everything else benefits from about a 5 minute rest. A duck breast is just like a steak: If you don’t rest it, the juices will run all over your cutting board — and not down your chin, where they should be.
You can slice the breast from either end, either side up. You can get thinner slices by starting at the meat end, but you lose a little of the crispiness of the skin. If you are serving a whole breast, always serve it skin side up, with its sauce underneath.
That’s it. This may sound like a long process, but it all comes together in a few minutes, once you start cooking.
Duck Breast with Cherry Port Wine Reduction
Ingredients:
- 2 5-to 6-ounce duck breast halves or one 12-to 16-ounce duck breast half
- 2 tablespoons (1/4 stick) chilled butter, divided
- 1/4 cup finely chopped shallot (about 1 large)
- 1/2 cup low-salt chicken broth
- 12 pitted sweet red cherries, cut in half, fresh or frozen, thawed
- 3 tablespoons tawny Port
- 1 tablespoon orange blossom honey
Method:
- Using sharp knife, score skin in 3/4-inch diamond pattern (do not cut into flesh). DO AHEAD: Can be made 8 hours ahead. Cover and chill.
- Melt 1 tablespoon butter in heavy large skillet over medium-high heat. Sprinkle duck with salt and pepper.
- Add duck, skin side down, to skillet and cook until skin is browned and crisp, about 5 minutes.
- Turn duck breasts over, reduce heat to medium, and cook until browned and cooked to desired doneness, about 4 minutes longer for small breasts and 8 minutes longer for large breast for medium-rare.
- Transfer to work surface, tent with foil to keep warm, and let rest 10 minutes.
- Meanwhile, pour off all but 2 tablespoons drippings from skillet. Add shallot to skillet and stir over medium heat 30 seconds. Add broth, cherries, Port, and honey. Increase heat to high and boil until sauce is reduced to glaze, stirring often, about 3 minutes. Whisk in 1 tablespoon cold butter. Season sauce to taste with salt and pepper.
- Thinly slice duck. Fan slices out on plates. Spoon sauce over and serve.